Designing the temple
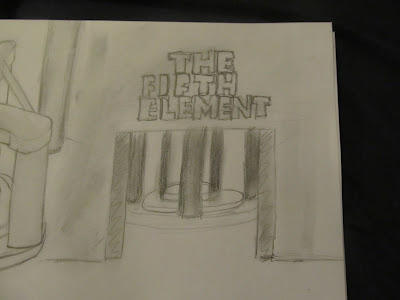
The design of the centre piece is inspired by one of the shapes on the wall in the film's temple, the top view of the centre piece is shaped like that pattern. There are 5 doors around the temple, one of which is the entrance.
The view through the doorway is such that you can see 5 pillars and the title of the film. This layout of 5 vertical lines can be seen throughout the film and various graphics on merchandise.

Planning the shots
Modelling the temple
As I have spent the Christmas getting to grips with modelling in Maya; I decided to use it to do all the 3D elements of the project. I Built the centre piece of the temple from the ground up. Starting with the base rings, then the supporting pillars then the top stones and stone banners.
I then layed out a grid for the sand and subdivided it several times. Using Maya's soft selection tool, I was able to model the waves of sand by moving one vertex and the rest would smooth into a hump shape.
The little rooms that can be seen through the door are a means of avoiding modelling outside geometry.
Texturing the temple
As i have not fully learnt how to UV unwrap in MAYA I used the UV texture projection tool to make sure that the textures were properly proportioned. Once I had a seamless texture i was happy with (edited in Photoshop); I used CRAZYBUMP to generate the various maps (mainly the normal) to give the textures some depth and make them react to light properly.
Particles
In the centre of the temple I wanted a cylinder of particles that rotate throughout the shots. To create this, I created an emitter and a cylinder, making the cylinder a collider. I then ran a particle simulation to generate a decent number of particles I then set the initial state of the particles so that they would all be visible from the start and turned off the emitter so the particles didn't become too dense. By adding a vortex field to the particle system i was able to make the particles turn inside the cylinder. I then cached the movement and position of the particles so they would always hold the same position at a specific frame.
Lighting and Rendering
After dismissing the vector renderer idea, i started playing around with vray, however, as it is only available on university computers i decided to switch to mentle ray which meant that I could utilise my time on my home pc as well. While not giving as gooder finish as vray, it was a suitible alternative based on the time frame.
Sequencing
In order to sync the animation up to the music track that I had mixed to merge with the actual film, I exported a xml sequence file from premiere. This allowed me to use Maya's camera sequencer to create the sequence I wanted and time it with the audio clip. I found that using this method gave me more flexibility to change the timings before rendering. Unfortunately Maya currently doesn't have a 'render sequence' option other than 'play-blast sequence' which is essentially a screen recorder. This meant that i had to render each shot individually, rather than set up a render que.
Final Product


No comments:
Post a Comment