Tuesday 26 February 2013
Monday 25 February 2013
The Final Element
Original thoughts
The original plan for this section was to zoom out of the earth, through the traffic light barrier, past a sign and then finishing on a 3D space ship with the directors name.
.JPG)

 I originally designed the ship to be rendered with the vector renderer, so when I changed to using mental ray instead I had to do some minor redesigns.
Despite the time spent on development of the sky ship, I still aren't completely happy with it and have decided to completely change the way I'm going to approach this sequence. I will add more names than planned on the sign board and then use the traffic light morphing text I tested in the planning stage to show the directors name before fading out to the computer screen from the film. I felt this ending flowed into the new sequence better than it would have done if id have ended it with the 3D ship.


Saturday 23 February 2013
The Desert/City Element Part 2
As I said in the previous post, I have been back to the desert shots and adjusted the timings to slow them down a bit.
I now have a week to refine and finish the project, so I'm going to start by finishing off the city.

 I was using mental ray sun and sky physics for all the desert and city shots to get a nice even distribution of lighting. Unfortunately, after rendering some areas showed the edge of the geometry. This meant that I had to create and track in a replacement sky and desert matte painting. This wasn't an ideal solution as the depth of field isn't as accurate as it would have been if it was exported from Maya.

I now have a week to refine and finish the project, so I'm going to start by finishing off the city.

The first step of this was working out the movement of the camera to ensure that the text can be read on the buildings (as that is the main purpose of the piece). One Id got the sequence mapped out, I was able to fill in the blank parts of the city without having to waist time building geometry.
 I was using mental ray sun and sky physics for all the desert and city shots to get a nice even distribution of lighting. Unfortunately, after rendering some areas showed the edge of the geometry. This meant that I had to create and track in a replacement sky and desert matte painting. This wasn't an ideal solution as the depth of field isn't as accurate as it would have been if it was exported from Maya.
Thursday 21 February 2013
Presentation Feedback
Well today was the day when my work gets put under the scrutiny of my fellow course mates and lecturer.
While I had more to present than some members of the group, I still was unhappy that I did not have a completed piece of work to present.
One of the main criticism with my work was the camera movement and speed of the animation. I had already noticed the speed was too fast with some of the desert shots and slowed down the frame rate in the edit but i did not want to compromise on the quality too much. I will be re-pacing the sequence inside Maya and re-rendering so that the frame rate is consistent.
I am also going to change some of the camera movements within the temple so that the sequence runs smoother and a bit less jerky.
Tuesday 19 February 2013
The Desert/City Element Part 1
This next section in the title sequence will use the taxi, seen exiting the temple, as a link. The taxi will then drive through the open desert and end up linking to the city at the end of the road.
I wanted the camera work in this section to mimic that if the wide helicopter shots that have become associated with large, open desert planes. This will mean that I will have to set up enough geometry or a matte painting that appears to go off to a horizon.

 The inspiration for the design of the desert road came from the DVD box for 'The Fifth Element'. I liked the way the checked pattern gives a sense of distance and speed and scale.
I've decided to try and avoid having to use matte paintings for these shots, so the sand is a wide repeating pattern and I'm using camera positions to try and disguise the face that there is no sky.
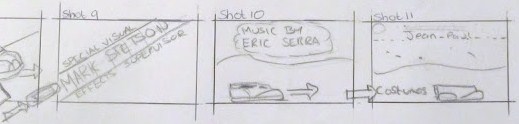
 When it came to composing the shots, I decided that Shots 10 and 11 provided too much variation to the already complex journey. This is why I have changed them to be more of an overhead shots.
 The city is intended to be the second stage of the title sequence. I originally planned to have several 'helicopter' style flyover shots of the city. However, the time frame of this project dictated that the amount of buildings and size of the city needed to be as minimal as possible.
 I started with the glass/text buildings which were the focal point of the shot. These used a slight glow and a metallic mental ray texture to really direct the viewers attention to them. The design of the other buildings in the city was a mixture of inspiration from buildings seen in the film itself and the intention of making them duller than the 'text buildings'.
One of the main buildings that made up the city was the octagonal buildings with the vertical subway carts.
This building will be key to make the city look active throughout the sequence as, apart from them the only other animation is the taxis moving.

I wanted the camera work in this section to mimic that if the wide helicopter shots that have become associated with large, open desert planes. This will mean that I will have to set up enough geometry or a matte painting that appears to go off to a horizon.

 The inspiration for the design of the desert road came from the DVD box for 'The Fifth Element'. I liked the way the checked pattern gives a sense of distance and speed and scale.
I've decided to try and avoid having to use matte paintings for these shots, so the sand is a wide repeating pattern and I'm using camera positions to try and disguise the face that there is no sky.


One of the main buildings that made up the city was the octagonal buildings with the vertical subway carts.
This building will be key to make the city look active throughout the sequence as, apart from them the only other animation is the taxis moving.
These buildings were inspired from the subway buildings that added to the unique design of the city in the film. I decided to use the vertical motion of the tram to flow from the horizontal tracking of the taxi.

Unfortunately, this the presentation day is tomorrow so I am going to have to compile what shots I have got completed in order to present for crit and analysis from the rest of the group. The city is still only half finished so I will render out a short scene to give an idea of how it is going to look.
Sunday 17 February 2013
The Temple Element
This blog post will document the progress of the temple (opening of the title sequence) and will show the various steps.
Designing the temple
The design of the centre piece is inspired by one of the shapes on the wall in the film's temple, the top view of the centre piece is shaped like that pattern. There are 5 doors around the temple, one of which is the entrance.


Planning the shots

Modelling the temple
As I have spent the Christmas getting to grips with modelling in Maya; I decided to use it to do all the 3D elements of the project. I Built the centre piece of the temple from the ground up. Starting with the base rings, then the supporting pillars then the top stones and stone banners.
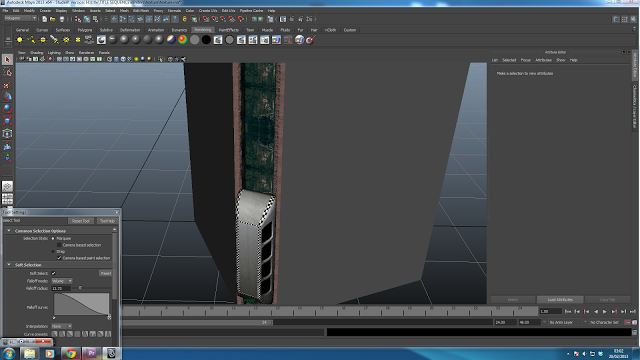
I then layed out a grid for the sand and subdivided it several times. Using Maya's soft selection tool, I was able to model the waves of sand by moving one vertex and the rest would smooth into a hump shape.
The little rooms that can be seen through the door are a means of avoiding modelling outside geometry.
Texturing the temple
As i have not fully learnt how to UV unwrap in MAYA I used the UV texture projection tool to make sure that the textures were properly proportioned. Once I had a seamless texture i was happy with (edited in Photoshop); I used CRAZYBUMP to generate the various maps (mainly the normal) to give the textures some depth and make them react to light properly.
Particles
In the centre of the temple I wanted a cylinder of particles that rotate throughout the shots. To create this, I created an emitter and a cylinder, making the cylinder a collider. I then ran a particle simulation to generate a decent number of particles I then set the initial state of the particles so that they would all be visible from the start and turned off the emitter so the particles didn't become too dense. By adding a vortex field to the particle system i was able to make the particles turn inside the cylinder. I then cached the movement and position of the particles so they would always hold the same position at a specific frame.
Lighting and Rendering
After dismissing the vector renderer idea, i started playing around with vray, however, as it is only available on university computers i decided to switch to mentle ray which meant that I could utilise my time on my home pc as well. While not giving as gooder finish as vray, it was a suitible alternative based on the time frame.
Sequencing
In order to sync the animation up to the music track that I had mixed to merge with the actual film, I exported a xml sequence file from premiere. This allowed me to use Maya's camera sequencer to create the sequence I wanted and time it with the audio clip. I found that using this method gave me more flexibility to change the timings before rendering. Unfortunately Maya currently doesn't have a 'render sequence' option other than 'play-blast sequence' which is essentially a screen recorder. This meant that i had to render each shot individually, rather than set up a render que.
Final Product
Designing the temple
The design of the centre piece is inspired by one of the shapes on the wall in the film's temple, the top view of the centre piece is shaped like that pattern. There are 5 doors around the temple, one of which is the entrance.

The view through the doorway is such that you can see 5 pillars and the title of the film. This layout of 5 vertical lines can be seen throughout the film and various graphics on merchandise.

Planning the shots

Modelling the temple
As I have spent the Christmas getting to grips with modelling in Maya; I decided to use it to do all the 3D elements of the project. I Built the centre piece of the temple from the ground up. Starting with the base rings, then the supporting pillars then the top stones and stone banners.
I then layed out a grid for the sand and subdivided it several times. Using Maya's soft selection tool, I was able to model the waves of sand by moving one vertex and the rest would smooth into a hump shape.
The little rooms that can be seen through the door are a means of avoiding modelling outside geometry.
Texturing the temple
As i have not fully learnt how to UV unwrap in MAYA I used the UV texture projection tool to make sure that the textures were properly proportioned. Once I had a seamless texture i was happy with (edited in Photoshop); I used CRAZYBUMP to generate the various maps (mainly the normal) to give the textures some depth and make them react to light properly.
Particles
In the centre of the temple I wanted a cylinder of particles that rotate throughout the shots. To create this, I created an emitter and a cylinder, making the cylinder a collider. I then ran a particle simulation to generate a decent number of particles I then set the initial state of the particles so that they would all be visible from the start and turned off the emitter so the particles didn't become too dense. By adding a vortex field to the particle system i was able to make the particles turn inside the cylinder. I then cached the movement and position of the particles so they would always hold the same position at a specific frame.
Lighting and Rendering
After dismissing the vector renderer idea, i started playing around with vray, however, as it is only available on university computers i decided to switch to mentle ray which meant that I could utilise my time on my home pc as well. While not giving as gooder finish as vray, it was a suitible alternative based on the time frame.
Sequencing
In order to sync the animation up to the music track that I had mixed to merge with the actual film, I exported a xml sequence file from premiere. This allowed me to use Maya's camera sequencer to create the sequence I wanted and time it with the audio clip. I found that using this method gave me more flexibility to change the timings before rendering. Unfortunately Maya currently doesn't have a 'render sequence' option other than 'play-blast sequence' which is essentially a screen recorder. This meant that i had to render each shot individually, rather than set up a render que.
Final Product
Saturday 16 February 2013
The Font Element
As this project is focusing largely on the typography, it is very important that the fonts fit in with the visual style of the piece. To start with I did several searches to try and find the fonts that were used in the film, or on the DVD cover.
rBNVeV(W1hQ~~_35.JPG?set_id=89040003C1) This search didn't get anywhere, so I decided that I would try and match a the font into the scene myself.
This search didn't get anywhere, so I decided that I would try and match a the font into the scene myself.
For the temple scene I tried to find a font that fitted in with the Egyptian style writing that is in the film. This had to be not to sharp, but still had to be legible. In the end I settled on NYALA.
For the City scene a lot of the text will be projected onto buildings so it needs to be bold in order for it to be legible. In the end I settled for Chunk Five
As I found myself working on university computers more and more, I found that they didn't allow installation of fonts. For this reason, I had to find a font that had similar attributes of the font I had already used; Rockwell extra bold seemed a good fit for an alternative.
Sunday 10 February 2013
The Render Element
Vector renderer
My original intention was to use Mayas vector renderer to create a flat looking composition that still possessed some of the qualities 3d work. I drew inspiration for this from the title sequence from the 2004
Thunderbird's film.
https://vimeo.com/10530929
One of the looks that i particularly liked from this opening sequence was this:

I decided to test this style with the models i have already produced.
TEMP PHOTO
I like the way this effect works for the block shapes in the temple, however, when it comes to some of the details on the taxi it doesn't look as good.
TAXI PHOTO
I did try a few different render settings including a normal render and then a vector outline render that were composited together.
I was very much undecided about whether or not to pursue this technique further. After a feedback session with my tutor, and him sharing the uncertainty about whether the technique was the best route forward for the project.
For this and other reasons, I have decided to move to a more realistic look using mental ray renderer. Unfortunately, most of the work that has already been done will need to be revisited to re-texture the models using mental ray shaders.
Tuesday 5 February 2013
The Test Element
Here are some of the various test that i have tests I have done. The first was playing around with the traffic lights that surrounded the planets. Althouth the animation timing of the effect needs some work i really like the look of the text in this effect.
This test was playing around with the idea of a wind eroding the stone structures in the desert. This was one of my favourite ideas when i was thinking of ways to show text, however, having done the test i can see that it is not going to work as well as i thought.
This was another idea that I liked when doing the initial sketches, and while the test is very crude with poor camera animation. I feel that the look is not really what im going for I this piece.
based on these tests i feel that I want to spend less of the piece in the desert. I am going to design a temple like structure and then move into space.
Monday 4 February 2013
The Sound element
After listening through the soundtrack to 'Fifth element' the track that I think would fit a title sequence best is
http://www.youtube.com/watch?v=Nav0DqnAouU
As it is a fairly long track i will only be using a soundbite from the clip. I will also use various sound overlays to link in with the action on screen.
As it is a fairly long track i will only be using a soundbite from the clip. I will also use various sound overlays to link in with the action on screen.
Friday 1 February 2013
INITIAL SKETCHES
I see, based on the place in the intro that the piece will sit, a piece that takes a journey from desert to sky working quite well. I like the idea of a sandstorm effecting the letters of the words and the going on to erode the letters of the pyramid style lettering beneath.

Another idea that sprang to mind upon first viewing the film, was creating flying ships that are molded out of various names and positions.

My third idea that emerged from watching the film was a morphing of the line of traffic lights around the planets into a name.
I'm now going to spend the next few days doing dome tests to see how well the ideas work and which is best. I am also going to review the soundtrack to the film to find the perfect sound element to the piece.
Subscribe to:
Posts (Atom)